A Microsoft account serves as your personal key to a broad ecosystem of Microsoft tools and services. Whether you want to check emails in Outlook, store files securely in OneDrive, play games on Xbox, or collaborate using Office apps and Teams, this single account ties everything together for a smooth, connected experience across devices.
If you’ve been thinking about setting one up but aren’t sure where to start, this straightforward guide breaks it down clearly. You’ll learn the exact steps to create your account, plus practical tips to keep it safe and make the most of it. No technical background needed — just follow along, and you’ll be ready in minutes.
Creating a Microsoft Account in Three Simple Steps
Here’s how to get your account up and running quickly.
Step 1: Go to the Microsoft account sign-up page. Open any web browser on your computer, phone, or tablet (Chrome, Edge, Firefox, or Safari all work fine). Head to the official Microsoft account creation page — you can search for “create Microsoft account” or go directly to a trusted link like account.microsoft.com or signup.live.com.
Once there, look for the Sign in button (usually in the top right). Click it, and if you don’t already have an account, you’ll see an option that says something like “No account? Create one!” or “Get started.” This takes you straight into the registration flow. Bookmark this page for easy access later, as it’s your main hub for signing in.
Step 2: Choose or create an email address. On the sign-up screen, you’ll be asked for an email address. You have two easy choices:
- Use an email you already have: Enter any existing address, such as one from Gmail, Yahoo, or another provider. Microsoft will link it to your new account. This is convenient if you don’t want another inbox to manage.
- Create a fresh Outlook.com address: If you’d rather start clean, select the option for “Get a new email address.” Pick a username (like yourname123@outlook.com or something creative that’s easy to remember). Microsoft will check if it’s available and guide you through the rest.
After entering or creating the email, click Next.
Step 3: Set a strong password and finish the basics. Now it’s time to create a password. Make it secure by following these guidelines:
- Use at least 12 characters.
- Mix uppercase and lowercase letters, numbers, and symbols (for example: BlueSky2026!River).
- Avoid obvious choices like your name, birthday, or simple words that hackers can easily guess.
- Never reuse the same password on other websites.
You may also need to provide some basic details, such as your name, country/region, and date of birth, for verification and age-appropriate settings. Complete any captcha or human verification step if prompted — this helps prevent automated sign-ups.
Once you submit everything, your Microsoft account is created! You’ll usually be signed in automatically and can start using services right away.
Important Tips After Creating Your Account
Great job — your account is live. Before diving deep into apps and games, take a few minutes to strengthen and personalize them.
1. Turn on two-factor authentication (highly recommended). This adds a second layer of protection beyond your password. Even if someone gets hold of your password, they’ll still need a code from your phone or authenticator app to log in.
- Why it helps: It blocks most unauthorized access attempts.
- How to enable it: Sign in to your account settings, go to the Security section, and look for “Two-step verification” or “Advanced security options.” Follow the prompts to add a phone number or use the Microsoft Authenticator app.
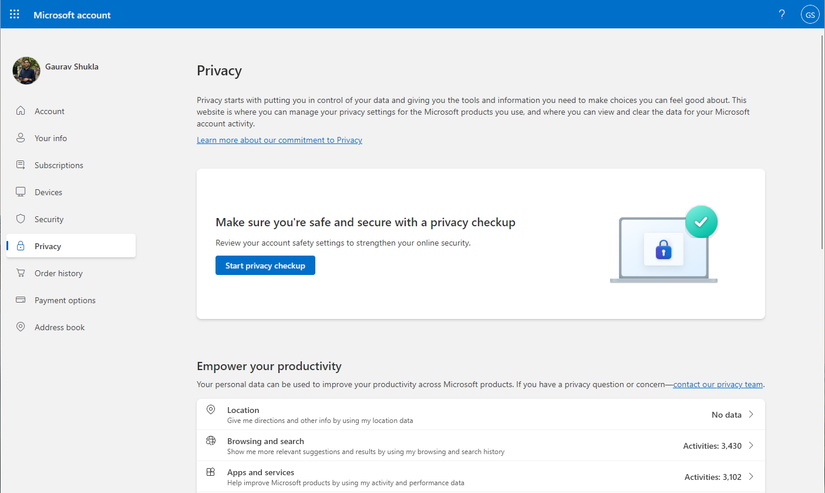
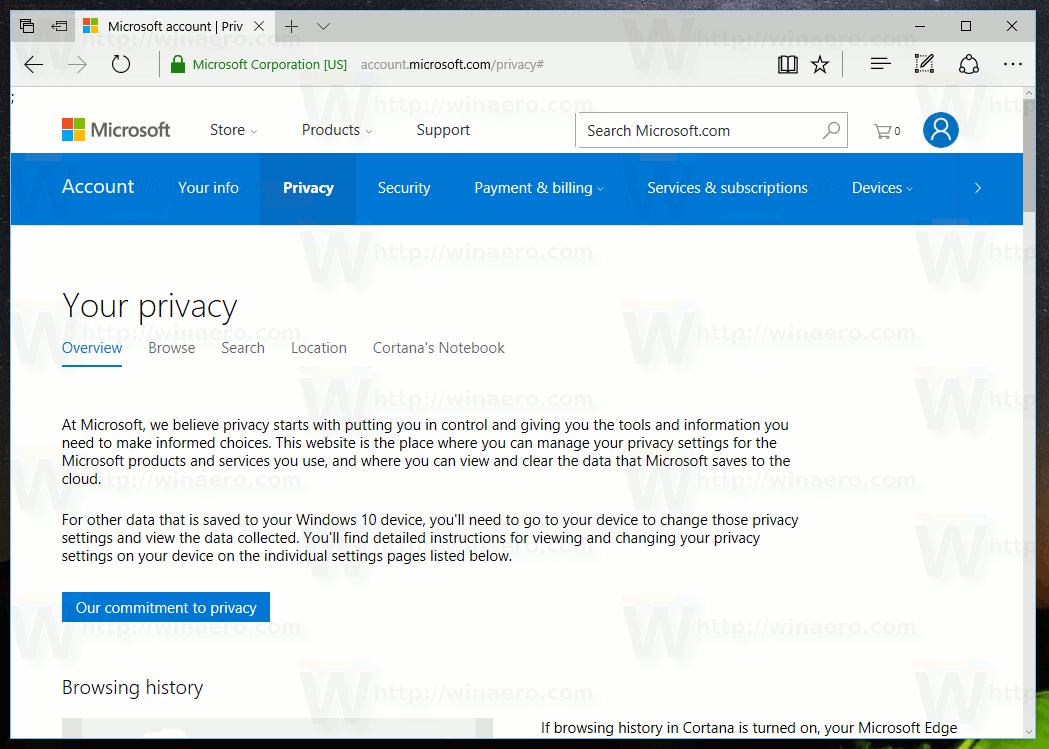
2. Check and adjust your privacy options. Microsoft uses some usage data to tailor your experience and improve services, but you control how much. Spend a moment reviewing these settings so everything feels right for you.
- Go to the privacy dashboard in your account.
- Look at options for data collection, personalized ads, location sharing, and diagnostic information.
- Adjust them anytime as your needs change.
3. Start exploring what your account unlocks. With your account ready, enjoy these popular services:
- Outlook: Send and receive emails, manage your calendar, and stay organized.
- OneDrive: Store photos, documents, and files in the cloud with easy access from any device.
- Xbox: Play games, connect with friends, and enjoy entertainment features.
- Microsoft 365 (formerly Office): Use Word, Excel, PowerPoint, and more for work or school projects.
- Teams: Chat, meet virtually, and collaborate with others.
Many of these work across phones, tablets, computers, and even consoles for true flexibility.
Keeping Your Microsoft Account Healthy and Secure
A good account needs occasional care, just like any important digital space. Here are key habits to build:
- Update your personal info regularly: Life changes — new phone number, address, or name. Edit these details in your account settings so recovery options stay current.
- Change your password from time to time: Pick a fresh, strong one every few months (or sooner if you suspect any risk). Avoid recycling old passwords.
- Monitor recent activity: Check the security dashboard for logins, devices, and actions. If anything looks unfamiliar, act quickly by changing your password or signing out suspicious sessions.
- Manage connected devices and apps: Review what phones, computers, or third-party apps have access. Remove anything you no longer use to reduce potential risks.
These small steps go a long way toward protecting your data and keeping things running smoothly.
Get Going with Your New Microsoft Account
Setting up a Microsoft account opens doors to email, storage, productivity, gaming, and more — all in one place. By following these steps and tips, you now have a secure foundation to enjoy everything Microsoft offers without hassle.
Whether you’re a student, professional, gamer, or just someone who wants reliable cloud tools, your account is ready to support you.
Here are clear, step-by-step visuals to help you easily create a Microsoft account.
Step 1: Visit the Microsoft account creation page
Go to the official Microsoft sign-up page in your browser and click Sign in. You’ll see an option to create a new account if you don’t have one.

:max_bytes(150000):strip_icc()/outlook-create-free-account-1e148f58cfbb430d9af1f9f3c5ae91bf.png)
These show the typical starting screen with the “Create one!” or “Create free account” prompt.
Step 2: Enter your email address or create a new one
You’ll be asked to enter an existing email (like Gmail) or choose “Get a new email address” to create a fresh @outlook.com address.

:max_bytes(150000):strip_icc()/006_1170658-5ba2d38dc9e77c005045d9d9.jpg)
The first image highlights entering a new email, and the second shows adding basic details like country and birthdate.
Step 3: Create a strong password and finish setup
Enter a secure password (at least 12 characters with letters, numbers, and symbols). Complete any remaining fields, and your account will be created.

:max_bytes(150000):strip_icc()/007_how-do-i-create-a-password-in-windows-2626071-4978246f5b734ce489a329cb4549046a.jpg)
These illustrate password creation screens (a similar flow appears during Microsoft account setup).
After creation: Your account is ready.
You’ll land on your Microsoft account dashboard or be signed in automatically.
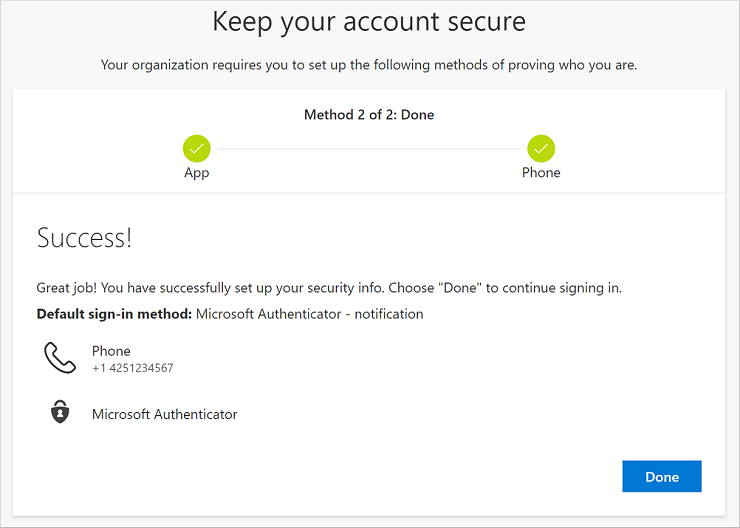
Bonus: Enabling two-factor authentication (recommended)
After setup, go to Security settings and turn on two-step verification for extra protection.

Bonus: Reviewing privacy settings
Visit the Privacy dashboard to adjust data sharing and personalization options.
These images should make the process much clearer. The actual screens may look slightly different depending on your device or if Microsoft updates the interface, but the flow remains very similar.
Quick tips while following along:
- Use a trusted browser and ensure you’re on the official Microsoft site (look for account.microsoft.com or signup.live.com).
- Have your phone handy if you want to add it for two-factor authentication right away.
If any step appears differently on your screen or you get stuck, feel free to describe what you see, and I’ll guide you further. Enjoy your new Microsoft account.
Microsoft Account Password Requirements (for personal Microsoft accounts used with Outlook, OneDrive, Xbox, etc.).
Here’s a clear and practical explanation of Microsoft account password requirements:
Official Minimum Requirements
When creating or changing a Microsoft account password, it must meet these basic rules:
- Length: At least 8 characters long. There is no strict upper limit in most cases (up to 256 characters is generally allowed), but very long passwords are fine as long as the system accepts them.
- Character variety (complexity): Your password must include characters from at least three out of these four categories:
- Uppercase letters — A, B, C, … (including accented characters like É, Ñ)
- Lowercase letters — a, b, c, … (including accented characters like é, ñ)
- Numbers — 0, 1, 2, …, 9
- Symbols/special characters — ! @ # $ % ^ & * ( ) _ + – = { } [ ] | \ : ” ; ‘ < > , . ? / ~
Examples that meet the minimum:
- River2026! (uppercase + lowercase + numbers + symbol = 4 categories, 10 characters)
- blueSky#45 (lowercase + uppercase + symbol + numbers)
- Passw0rd2026 (may be rejected if it’s too common or predictable)
Examples that usually fail:
- password (only lowercase, too common)
- 12345678 (only numbers)
- abcdefgh (only lowercase)
- River2026 (uppercase + lowercase + numbers = only 3 categories, but if it feels too simple, it might still be flagged)
Microsoft’s Strong Password Recommendations
Microsoft strongly encourages going beyond the minimum for better security:
- Make it at least 12 characters — 14 or more is even better.
- Use a mix of all four categories when possible (not just three).
- Avoid anything easy to guess:
- Your name, birthday, pet’s name, or family information
- Common words or phrases (e.g., “password”, “admin”, “letmein”)
- Sequences like “123456”, “abcdef”, or keyboard patterns (“qwerty”)
- Do not reuse the same password across different websites or services.
- Make it unique and memorable to you (e.g., a passphrase like “MyFavoriteRiverIn2026!”).
Microsoft also automatically blocks many common weak passwords during signup, so even if it technically meets the rules, a very obvious one like “Password123” will likely be rejected.
Why These Rules Exist
- Length is one of the most important factors. Longer passwords are much harder for hackers to crack using brute-force or guessing tools.
- Variety makes automated attacks slower.
- However, modern security advice (from Microsoft and security experts) now emphasizes:
- Long, unique passwords
- Two-factor authentication (2FA) is the real game-changer
- Avoiding forced frequent password changes (unless there’s a breach)
Quick Tips for Creating a Strong Microsoft Password
- Aim for 14+ characters.
- Use a memorable phrase and modify it: Example: “I love swimming in the river every morning in 2026!” → ILoveSwimRiver2026!
- Or use a password manager to generate and store truly random, strong passwords.
- Once created, enable two-step verification (2FA) in your Microsoft account security settings — this protects your account even if your password is somehow compromised.
What Happens If Your Password Doesn’t Meet the Rules?
You’ll see an error message like: “This password does not meet the length, complexity, or history requirements.” Just adjust it by adding more variety or length and try again.
Would you like some example passwords that fully meet (and exceed) Microsoft’s recommendations? Or tips on how to change your password safely right now? Let me know!
Remember: The strongest protection comes from a good password plus two-factor authentication enabled on your account.
Two-factor Authentication (2FA) for your Microsoft Account.
Two-factor authentication (also called two-step verification by Microsoft) adds an extra layer of security to your account. Instead of signing in with just your password (something you know), you must also prove it’s really you with a second factor (something you have).
This second step makes it much harder for hackers to break into your account — even if they steal or guess your password, they usually can’t complete the login without the second piece.
Think of it like this:
- Step 1 (Password): The key to your front door.
- Step 2 (Second factor): A security guard who checks your ID before letting you in.
Why It Matters for Your Microsoft Account
Your Microsoft account connects to important things like:
- Outlook email
- OneDrive files and photos
- Xbox gaming and purchases
- Microsoft 365 apps (Word, Excel, etc.)
- Teams and more
If someone gains access, they could read your emails, delete your files, make purchases, or lock you out. 2FA greatly reduces this risk.
Microsoft calls it two-step verification, but it’s the same concept as 2FA or multi-factor authentication (MFA).
How Two-Factor Authentication Works with Microsoft
- You enter your email/username and password as usual.
- If you’re signing in from a new or untrusted device (or sometimes even on trusted ones), Microsoft asks for a second verification.
- You receive and provide the second factor (a code or approval).
- You’re signed in successfully.
On devices you mark as trusted, you may skip the second step for convenience (but you can still require it every time if you prefer).
Common Second-Factor Options for Microsoft
Microsoft gives you several easy choices:
- Microsoft Authenticator app (recommended) Free app for iPhone or Android.
- You get a push notification — just tap “Approve”.
- Or it generates a time-based code you type in.
- Supports biometrics (fingerprint or face ID) for quick approval.
- Most secure and convenient option.
- Text message (SMS) to your phone number. Microsoft sends a code via text.
- Phone call: An automated voice call reads the code to you.
- Alternate email address: A code is sent to a backup email you control.
- Backup/recovery codes (important to save): A set of one-time codes you can print or store safely for emergencies.
Best practice: Set up at least two or three different methods. This way, if you lose your phone, you still have backup options.
How to Turn On Two-Factor Authentication
It only takes a few minutes:
- Go to your Microsoft account security page: account.microsoft.com/security
- Sign in with your password.
- Click Manage how I sign in (or look under Additional security).
- Find Two-step verification and select Turn on.
- Follow the on-screen prompts to add your preferred methods (the Authenticator app is usually suggested first).
- You may need to scan a QR code with the Authenticator app.
- Test it by signing out and signing back in.
Microsoft will guide you and may offer to generate recovery codes — save these securely (not on the same device).
Important Things to Know
- Once enabled, you’ll need both your password and the second factor to sign in on most new devices.
- If you lose access to all your verification methods, recovery can take up to 30 days (or longer). That’s why having multiple methods and backup codes is essential.
- You can mark frequently used devices as trusted so you don’t get prompted every time.
- The Microsoft Authenticator app also supports passwordless sign-in on some devices (using your phone’s biometrics instead of typing a password).
Quick Recommendation
After creating your Microsoft account:
- Enable two-factor authentication right away.
- Prefer the Microsoft Authenticator app over SMS (it’s more secure because SMS can sometimes be intercepted).
- Add a backup phone number or alternate email.
- Save your recovery codes in a safe place (like a password manager or printed copy).
Frequently Asked Questions
Can you create a Microsoft account using a Gmail (or other non-Microsoft) email address?
Yes, absolutely. You can link an existing Gmail, Yahoo, or any other email address to serve as your sign-in for the Microsoft account. It works well and lets you keep using your preferred inbox while accessing Microsoft services.
What’s the difference between a personal Microsoft account and a work or school account?
A personal Microsoft account is for individual use. It gives access to consumer services like Outlook.com, OneDrive (personal), Xbox, Skype, and the Microsoft Store.
A work or school account (often powered by Microsoft Entra ID or Azure Active Directory) is managed by an organization or educational institution. It connects to business tools like Microsoft 365 for work, Teams for enterprise, SharePoint, and admin-controlled features. Your IT department usually handles security and settings for these. You can’t freely mix the two for the same services due to how they’re structured.
Can you create a Microsoft account using only a phone number instead of an email?
Generally, no. Microsoft account creation requires an email address as the primary identifier. While you can add a phone number later for verification or as an alias (alternative sign-in method), the initial setup needs an email.
How do you recover your Microsoft account if you forget your password?
Go to the Microsoft sign-in page and select “Forgot password?” or use the account recovery tools. You’ll verify your identity through alternate email, phone, or security questions. If you have two-factor authentication enabled, you may need access to your second method or a recovery code. Microsoft also offers a recovery form for more complex cases — answer questions about your account usage to prove ownership. Always keep recovery options updated.
What happens if you lose access to your two-factor authentication method?
This can be tricky but manageable. Use any backup or alternate verification methods you set up (like a secondary phone or email). Microsoft provides a 25-digit recovery code you should have saved when enabling two-factor — keep it safe offline. In some cases, you may need to wait 30 days for a security info reset or fill out the account recovery form. Prevention is best: back up your authenticator app and generate recovery codes ahead of time.
Can you change your Microsoft account email alias or primary sign-in address later?
Yes. You can add new email aliases or phone numbers as alternative ways to sign in. To change your primary alias (the main address shown on devices), go to your account’s “Manage how you sign in” section, make the desired alias primary, and remove or keep others as needed. Note that some restrictions apply if the address is tied to work/school domains. Always keep at least one reliable sign-in method active.
Do you need a Microsoft account to use Outlook, OneDrive, and Teams, and how does that affect your calendar routine?
For full features and cross-device syncing, yes — a Microsoft account is usually required. You can use basic versions of some apps without signing in, but signing in unlocks cloud storage, email syncing, shared calendars, and collaboration.
With a signed-in account, your calendar in Outlook stays consistent across phone, computer, and web. Events, reminders, and shared schedules update automatically, making daily planning much easier and reducing missed appointments.
Your Microsoft account is now set and secure. Enjoy the convenience it brings to your digital life! If you run into any hiccups during setup, the official Microsoft support site has helpful troubleshooting tools.